Aida DSP OS User Manual
Connections
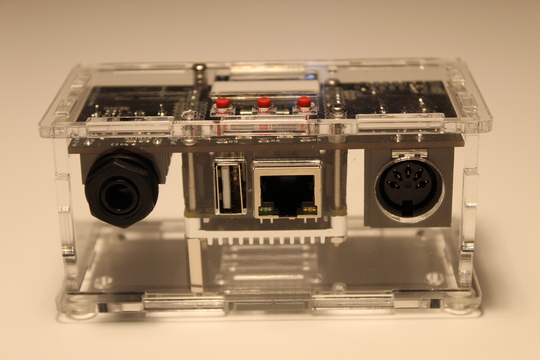
- Front panel, from left to right
- input audio mono (6.5mm jack, high impedance)
- USB host port for USB midi devices (USB type A female connector)
- Ethernet port (RJ-45 socket)
- midi in (standard 5 poles din connector optoisolated)
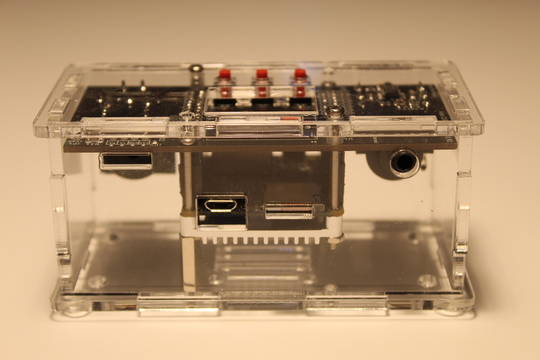
- Back panel, from left to right
- uart port (4 pin pinheader connector, arduino nano pinout )
- USB micro supply port
- SD-Card slot
- output audio stereo (3.5mm jack, line level)
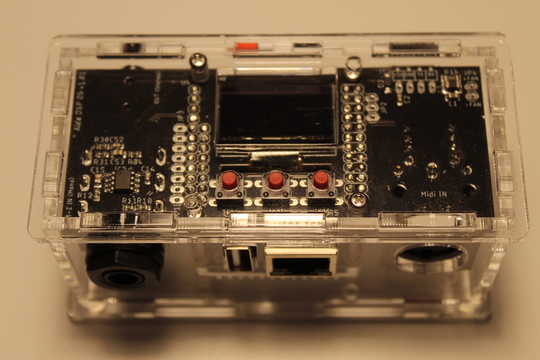
- Top panel
- OLED Display
- three buttons: K1 (left), K2 (center), K3 (right)
Glossary
- hmi: human machine interface. On Aida DSP OS it’s made with an OLED display and three buttons
- plugin: an audio effect
- …
Usage
Power on
To power on Aida DSP OS, connect USB micro supply port to a proper supply source. Compatible sources are
- Mobile phone adapter (verify it’s at least 2A)
- Mobile phone power bank
- Raspberry Pi power adapter
- The USB port of your laptop Pc (you’ll need a male USB micro to female USB type-A cable)
NOTE
Troubleshooting power supply issues
Symptoms of power supply failure are:
- Aida DSP OS seems freezed and doesn’t react to button press
- Aida DSP OS audio is noisy or not present
Common solutions:
- Check the minimum power requirements of your USB midi controller. Golden rule: if your USB midi keyboard has more than 16 keys then it’s better to power the keyboard using its own adapter, otherwise the current drawn from Aida DSP OS board could cause malfunctioning
- Avoid groud loops and if not possible use a mobile phone power bank to supply Aida DSP OS
USB mass storage mode
In this mode Aida DSP OS can be connected to a Pc for transferring files or change default system configuration.
NOTE
You need a USB micro to female USB type-A data cable. Please verify it’s a data cable! To check the cable count how many metal contacts has the male USB micro connector in the cable. If only two it’s a supply only cable, you need the one with all the contacts
- Connect USB back supply port to Pc with a USB data cable and press central button (K2)
- On Aida DSP OS’ display should appear “USB mass storage mode”
- In your Pc explore the new usb mass storage device
- Open file under .config/config with a simple text editor
- Customize the file
The configuration file is sort of INI file. If you don’t know what is it an INI file don’t worry and read the following, otherwise skip
INI files are organized in lines, if the line doesn't start with a ';', a '#' or a '['
then it's a valid line.
A valid line is used to specify a configuration. Example:

mode mod-duo

means the default startup mode for Aida DSP OS is Mod Duo mode. You can change it to

mode sampler

or

mode puredata

to start the board respectively in soundfont player mode or puredata mode.
When you finished to edit the configuration file, save it before exit and restart the board with a power cycle (this time no button press is necessary).
Aida DSP OS should now start with the new configuration active.
WiFi
The WiFi connection works only in access point mode. To enable WiFi simply connect the USB WiFi dongle to the board then power it. Once powered the board will creates its own network, you should connect to it with:
- SSID: AIDADSPOS
- PWD: aidadspos
The board ip using WiFi is 20.20.20.1
NOTE
Security used is WPA2. Hardware compatibility for now includes only this usb dongle or another one with the same chip
Ethernet
Simply connect an ethernet cable (CAT-5) between the board and your Pc. The board acts like a router and gives your Pc a valid ip address.
The board ip using ethernet is 10.10.10.1
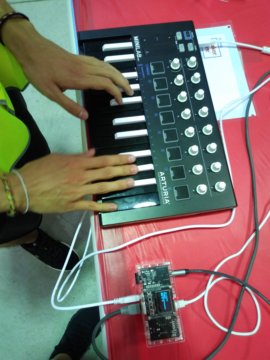
Midi
The board supports midi devices using the native DIN 5-poles input connector or USB midi devices connected to the board using the USB host port. The device, if supported, will be immediately recognized and configured.
How files are organized in the exposed partition
.
├── .config
├── .lv2plugins
├── .lv2pluginsbad
├── .oldlogs
├── .pedalboards
├── .puredata
└── .soundfonts
- .config contains the config file that stores system settings
- .lv2plugins contains all the lv2 plugins installed on the board
- .lv2plugins contains all the unstable lv2 plugins installed on the board
- .oldlogs contains all the relevant logs both from system and applications (logs are rotated every hour)
- .pedalboards contains all the Mod Duo pedalboards
- .puredata contains all the pd patches
- .soundfonts contains all the sounfonts installed on the board
Adding a soundfont
Soundfonts are organized in folders by format and instrument type:
.
├── gig
│   ├── Mellotron
│   └── Yamaha CF3
├── sf2
│   ├── FluidR3_GM.sf2
│   ├── FluidR3_GS.sf2
│   └── TimGM6mb.sf2
└── sfz
    ├── Bass
    ├── Brass
    ├── Drum Machines
    ├── Drums
    ├── Ethnic
    ├── Guitars
    ├── Organs
    ├── Other
    ├── Percussion
    ├── Pianos
    ├── Strings
    ├── Synths
    └── Woodwinds
Suppose you have a new soundfont called Piano1 and structured like that
└── Piano1
    ├── Samples
    │   ├── 1_A_a.wav
    │   ├── 1_Ab_b.wav
    │   └── ...
    └── Piano1.sfz
In Samples you’ll likely to see many .wav files or just one depending on how the soundfont has been created. Mine is just an example.
To copy this new soundfont to Aida DSP OS you need to copy all the Piano1 folder under
.soundfonts/sfz/Pianos
but it will also work in a new path like
.soundfonts/sfz/MySamples
Buttons behaviour in hmi
K1, K2 and K3 are managed as time controlled buttons. Exact behaviour depends on the mode and the page where you are: the first page displayed in all the modes after power on is the home.
Soundfont player mode
When started in this mode, Aida DSP OS is usable as a soundfont player. Soundfont is a sample-based synthesis controlled via midi.
In the simplest scenario, you play the midi keyboard and the midi notes are synthesized inside Aida DSP OS with the sound of the instrument that you selected: a piano, an organ, a mellotron…
On Aida DSP OS you have nearly ~4GB of instruments to choose with. You can view the list here.
The hmi in this mode lets you select the soundfont (instrument) you want to play. In addition to that, it lets you adjust other settings like the volume (soundfonts may have huge differences in volume between each others) or the midi channel
Available hmi pages in soundfont player mode
Home page
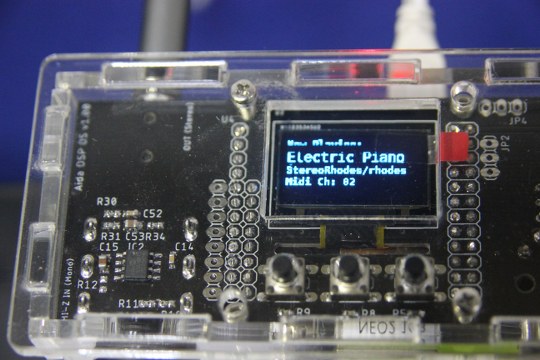
In the ‘HOME’ page is displayed the selected bank followed by the instrument. The structure of the soundfont in the image above is
.
└── Electric Piano
    └── StereoRhodes
        ├── 1_B_1r.wav
        ├── ...
        └── rhodes.sfz
at the bottom of the home page is displayed the current active midi channel
| Switch | Short Press | Long Press (> 1 sec) |
|---|---|---|
| K1 | Nothing | Nothing |
| K2 | To select page | Nothing |
| K3 | To options page | Nothing |
Select page(s)
These pages serves to select the instrument you want to play.
| Switch | Short Press | Long Press (> 1 sec) |
|---|---|---|
| K1 | Up | Back to prev. page |
| K2 | Select bank or instr. | Nothing |
| K3 | Down | Nothing |
Options
For midichannel settings, volume settings and so on
| Switch | Short Press | Long Press (> 1 sec) |
|---|---|---|
| K1 | Up/Incr. | Back to prev. page |
| K2 | Select option | Nothing |
| K3 | Down/Decr. | Nothing |
Mod-Duo mode
In this mode you can either
- Use the hmi to load a virtual pedalboard already saved on the board
- Create or modify a new virtual pedalboard using the web editor
Available hmi pages in Mod Duo mode
Home page
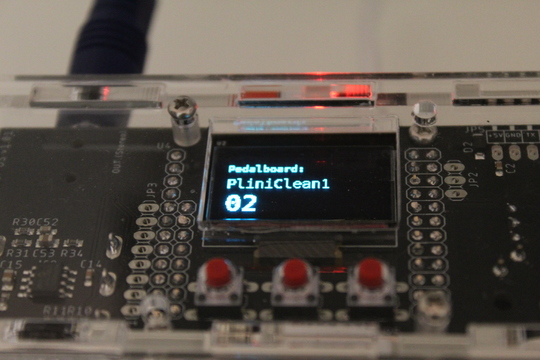
See which pedalboard is loaded
| Switch | Short Press | Long Press (> 1 sec) |
|---|---|---|
| K1 | Nothing | Nothing |
| K2 | To select page | Nothing |
| K3 | To resource monitor | Nothing |
Select page(s)
Select virtual pedalboard to load
| Switch | Short Press | Long Press (> 1 sec) |
|---|---|---|
| K1 | Back to home page | Nothing |
| K2 | Load selected pedalboard | Nothing |
| K3 | Scroll down list | Nothing |
Resource monitor
Shows CPU and RAM usage
| Switch | Short Press | Long Press (> 1 sec) |
|---|---|---|
| K1 | Back to home page | Nothing |
| K2 | Nothing | Nothing |
| K3 | Nothing | Nothing |
Mod Duo web editor
To use the web editor forst connect to the board using ethernet or WiFi, then open a browser and type
http://10.10.10.1:8888
or
http://20.20.20.1:8888
You can use the Mod Duo web editor to create a virtual pedalboard, to select and adjust an existing pedalboard and store it on the board. You can also map a parameter of an effect to an external midi cc compatible controller.
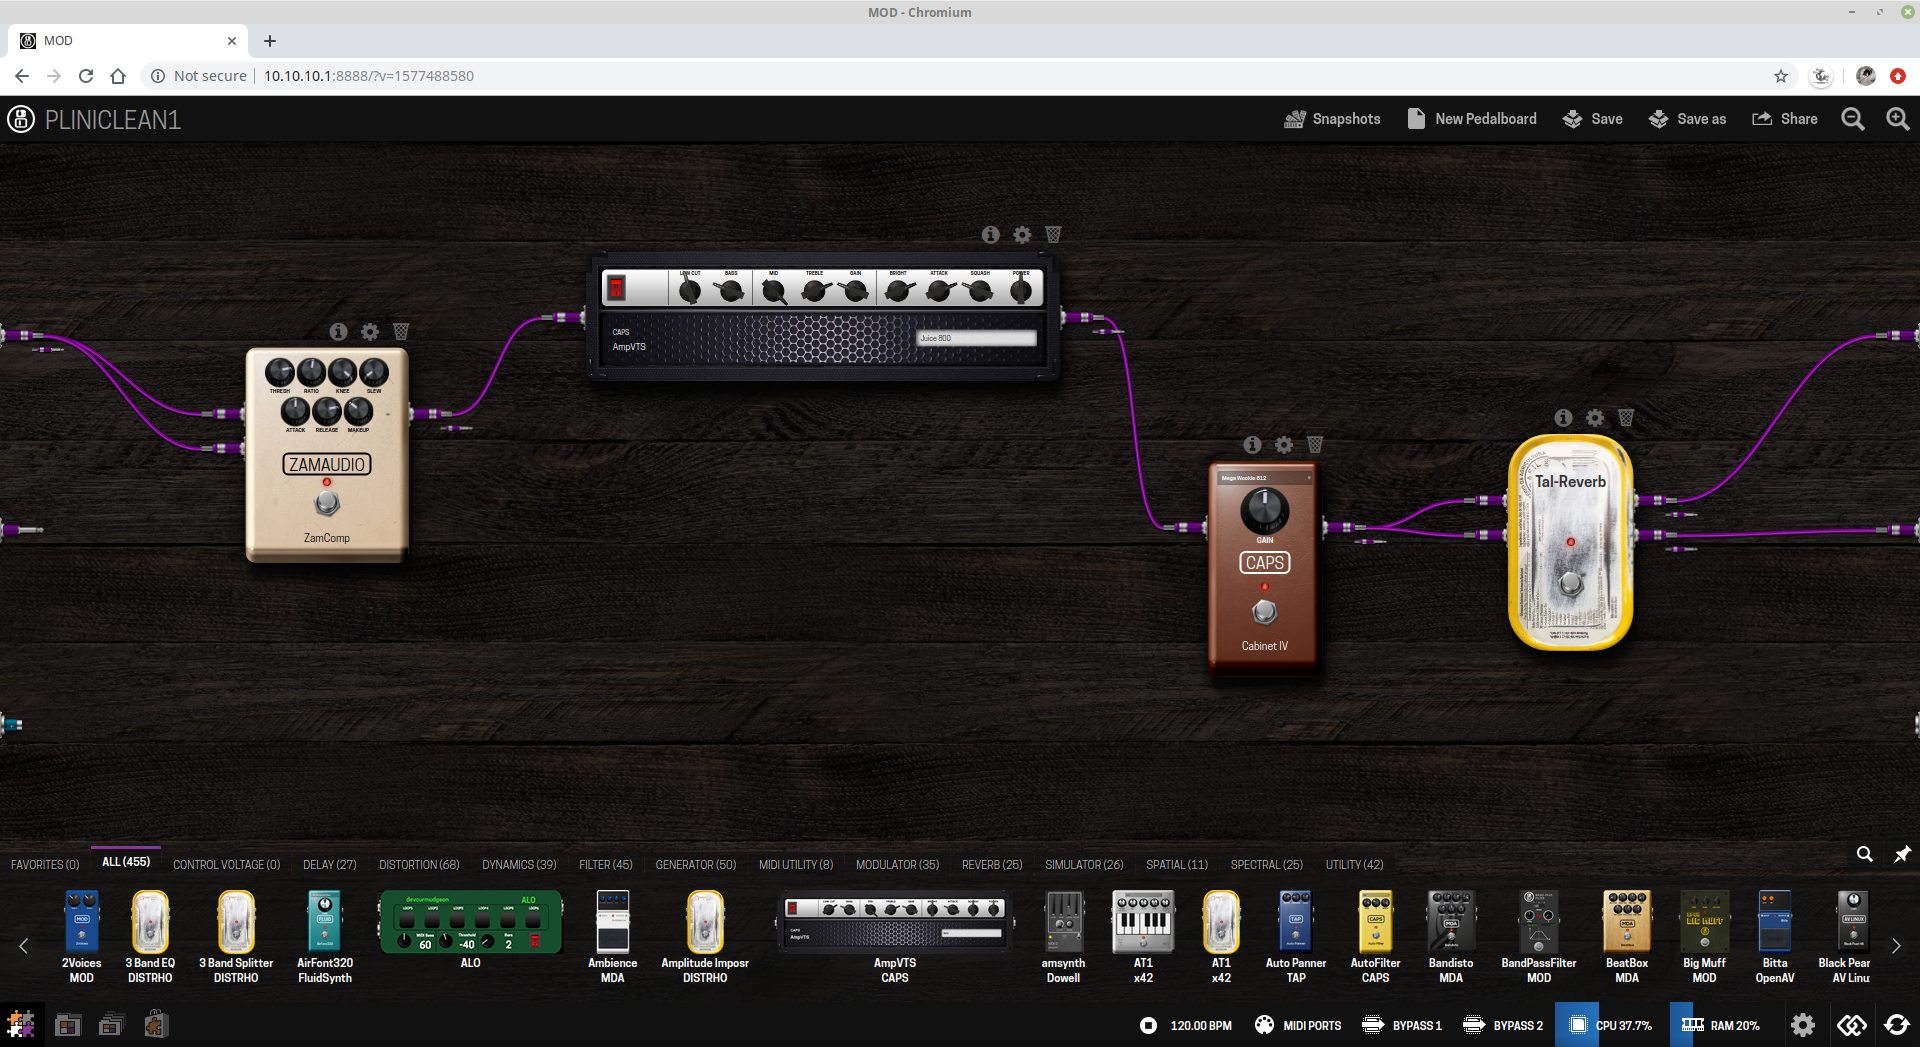
- The velvet jacks are the audio input (left) and the audio outputs (right)
- The pale blue jack on the bottom-left of the web editor is the optoisolated midi input
For in-depth explanation, please refer to wiki
NOTES
The wiki mentions a usb connection to use the web editor. This is not needed with Aida DSP OS just use the ethernet port or connect via WiFi as described in the previous section.
Installed on the board you can find a plugin called Level Meter you can use it to monitor internal volumes in any point of the pedalboard.
You need a html5 compatible browser to use the web editor. In practice you can use stable versions of Chrome, Firefox or Safari.
Puredata mode
In this mode you can select the pd patch and load it
Available hmi pages in puredata mode
Home page
See which patch is loaded
| Switch | Short Press | Long Press (> 1 sec) |
|---|---|---|
| K1 | Nothing | Nothing |
| K2 | To select page | Nothing |
| K3 | To resource monitor | Nothing |
Select page(s)
Select pd patch to load
| Switch | Short Press | Long Press (> 1 sec) |
|---|---|---|
| K1 | Back to home page | Nothing |
| K2 | Load selected patch | Nothing |
| K3 | Scroll down list | Nothing |
Resource monitor
Shows CPU and RAM usage
| Switch | Short Press | Long Press (> 1 sec) |
|---|---|---|
| K1 | Back to home page | Nothing |
| K2 | Nothing | Nothing |
| K3 | Nothing | Nothing |
Software Update
Updating the whole image
At the moment the procedure of software update consists in you downloading the new compressed binary image from a given link and then proceed to burn it to a valid SD Card (>= 32GB). The process isn’t so different (if not the same) from what’s currently done with a Raspberry Pi SD Card. Use balenaEtcher on your preferred Linux distribution or Windows 10.
If you need a step-by-step tutorial, you can follow this link.
If you want to check for new images, poll this page.
Updating a single application
At the moment the feature is not available. The update of a single software component in a situation like Aida DSP OS where multiple software components work together, is often a cause of malfunctioning and instability, so forget about this. Also throubleshooting or customer service on a stock of devices all with different combinations of software components is a mess.
Just to let you know.
Troubleshooting
System has been kept as simple and linear as possible, but since many combinations of factors could occour, what to do?
- Annotate the error displayed on the oled display, if any.
- Start the board in USB mass storage mode (see specific section) and copy folder .oldlogs to your Pc
- Contact the Aida DSP customer service Facebook
- Provide to the customer service the following files/informations:
- error showed on the oled display (if any)
- .oldlogs folder in a .zip archive
- informations on how to replicate the problem (if any)
We really hope it will never happens, but we need to be prepared. This is a list of common problems during the usage of Aida DSP OS, with the suggested solutions.
Specifications
Audio
- ADCs: 24 bit, 98dB SNR
- DACs: 24 bit, 100dB SNR
- Sampling rate: configurable, 48/96/192kHz (48kHz default)
- BUffer size: configurable, 128/256/512/1024 (256 default)
- Latency: ~10ms measured with an oscilloscope @ 48kHz, 256 buffer size
Board
- Quad-core 1GHz ARM Cortex-A53 cpu (64-bit)
- 1GB DDR3 RAM
- 32GB flash (SD Card read/write speed 95/20 MB/s)
- USB 2.0
- 10/100/1000 Ethernet
OLED
- 128x64 blue oled display
Supply
- 5V/2A
Power consumption
- Usually no more than 2.5W
Dimensions
- width 10,61 cm
- height 4,93 cm
- length 5,21 cm
Weight
- 0,144 g